 See those little pony walls to the left of the pool table? We were looking for something interesting to do with them. As you know, Pinterest is full of ideas and we found something to try - penny counters. You can do a search on Pinterest or Google and get all kinds of examples and instructions. I thought the best post was on this website: http://www.domesticimperfection.com/2012/05/ penny-countertop.
Here is what we did.
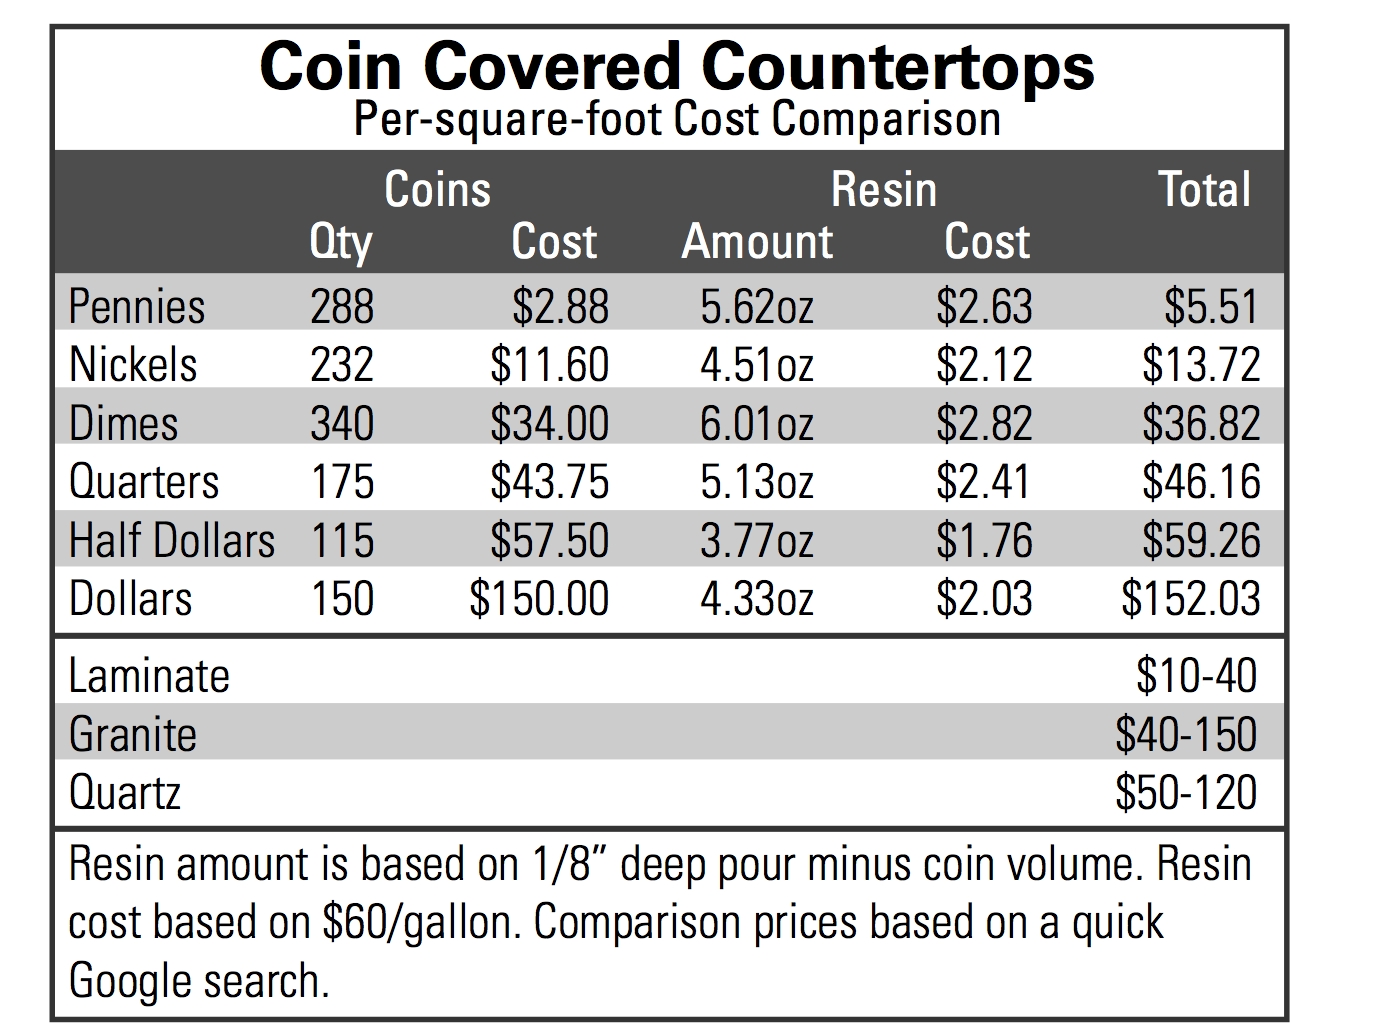 First, figure out how many pennies you will need. I found this handy chart online. I had to build these countertops from scratch so I cut some MDF to shape with a little overhang. Then I trimmed the sides with 1x2 cedar. I set the sides a just a little higher than than the MDF to allow the pennies to sit slightly below the edge. I painted the counter the same dark brown color that I used for the baseboards. A dark background is necessary to highlight the coins.
 Then get your pennies. This doesn't seem so hard but I think it was the hardest part of this project. Ideally you will find someone who wants to get rid of their penny collection and you can just buy what you need. We tallied all of our pennies on hand and still needed about $20 more. So, I went to my bank. Easy peasy, right? Wrong. All of the bank pennies were brand new. We decided that we liked the older pennies the best. Many of the websites talk about how to clean the pennies to get them shinier. I guess we are weird because we like the ones with "character." Some new ones were OK but too many looked strange. So my husband spent a LOT of time trying to tarnish them. He tried vinegar, lemon juice, bleach, even oven cleaner. Nothing really duplicated the old tarnished penny look, they just took away the new penny look. If you like the turquoise color copper sometimes takes, oven cleaner caused a similar patina. We then tried to buy some from the grocery store, some won't sell pennies. Of course the one that would had new pennies. Finally we bought some from a family member out of their collection. Whew! Now what to do with all those new pennies.
 We placed the pennies into place, no glue needed. Luckily the pennies fit across without and partial pennies. On the short ends we did have to trim some half pennies to fill in gaps. We used tin snips that we had on hand but it took a fair amount of strength.
 Then it was time to prepare the area. First I taped around the wall with plastic sheeting to catch any runoff. I also taped against the wall. Then I mixed the first batch. It's pretty easy to mix, it just takes a while to stir. I used an epoxy kit from Home Depot but if you have the time you can get cheaper epoxy online. One batch was sufficient to cover each side so it only required two batches. I then poured the epoxy in a thin stream over the pennies. A few times the stream pushed a penny out of place but it was easy to fix. I used a postcard to spread the epoxy evenly and I used a foam paintbrush to spread the epoxy evenly over the sides.
I did all of this just before leaving the house, thinking I would let it dry while I was gone. That was a mistake. As I was leaving, I noticed a few bubbles rising to the top. I went ahead and popped all of those but I wasn't able to stay long enough to pop the few others that showed up after I left. Also the sides could have used more attention. When I returned the next day the epoxy was dried hard. So the drips along the bottom of the counter were very difficult to remove without taking off some of the wood. Ideally the drips could have been sliced off when the epoxy was set but not so hard.
Finally, just a note about how important it is that your piece is VERY level. I thought mine was, but once the epoxy was set I can see that some portions didn't get as much coverage. I am considering doing one more thin coat over the old one but am hesitant because I read horror stories about it not setting properly. I will probably also need to sand the sides where you can see drip marks down the sides. Maybe I will just add a coat of polyurethane.
Despite these small problems, the countertops are very eye-catching and make a great conversation piece. I highly recommend this treatment if you want a fun surface cover.
No comments:
Post a Comment